반응형
SMALL
📌 개요
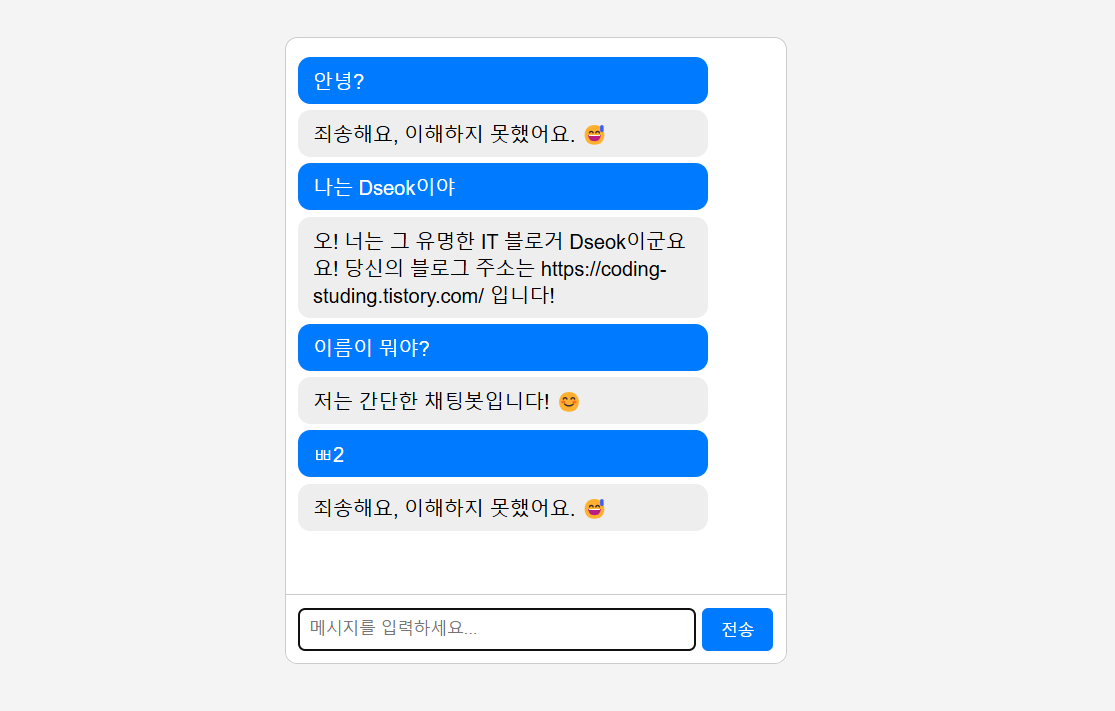
HTML, CSS, JavaScript를 활용하여 간단한 채팅봇 인터페이스를 구현해볼겁니다. 사용자가 입력한 메시지에 대해 자동 응답하는 기능을 포함하며, 기본적인 챗봇 대화 흐름을 설정합니다. 현재 서버가 없기 때문에 데이터는 정해 놓고 구현을 합니다. 답변을 정해 놓았기 때문에 한정적입니다.😂
📌 구현 기능
- 사용자가 입력한 메시지를 채팅창에 표시
- 챗봇이 자동으로 응답 메시지 출력
- 간단한 프롬프트 기반 응답 (예: 인사하면 인사 응답)
- UI 스타일링을 통해 실제 채팅 앱 같은 느낌 제공
📌 HTML 구조
<!DOCTYPE html>
<html lang="ko">
<head>
    <meta charset="UTF-8">
    <meta name="viewport" content="width=device-width, initial-scale=1.0">
    <title>채팅봇</title>
    <style>
        body {
            font-family: Arial, sans-serif;
            display: flex;
            justify-content: center;
            align-items: center;
            height: 100vh;
            background-color: #f4f4f4;
        }
        .chat-container {
            width: 400px;
            height: 500px;
            border: 1px solid #ccc;
            border-radius: 10px;
            background: white;
            display: flex;
            flex-direction: column;
            justify-content: space-between;
            overflow: hidden;
        }
        .chat-box {
            flex-grow: 1;
            padding: 10px;
            overflow-y: auto;
            max-height: 400px;
        }
        .input-area {
            display: flex;
            border-top: 1px solid #ccc;
            padding: 10px;
            background: white;
        }
        .input-area input {
            flex-grow: 1;
            padding: 8px;
            border: 1px solid #ccc;
            border-radius: 5px;
        }
        .input-area button {
            margin-left: 5px;
            padding: 8px 15px;
            border: none;
            background: #007bff;
            color: white;
            border-radius: 5px;
            cursor: pointer;
        }
        .message {
            padding: 8px 12px;
            margin: 5px 0;
            border-radius: 10px;
            max-width: 80%;
        }
        .user-message {
            background: #007bff;
            color: white;
            align-self: flex-end;
        }
        .bot-message {
            background: #eee;
            color: black;
            align-self: flex-start;
        }
    </style>
</head>
<body>
    <div class="chat-container">
        <div class="chat-box" id="chatBox"></div>
        <div class="input-area">
            <input type="text" id="userInput" placeholder="메시지를 입력하세요...">
            <button id="sendBtn">전송</button>
        </div>
    </div>

    <script>
        document.addEventListener("DOMContentLoaded", () => {
            const chatBox = document.getElementById("chatBox");
            const userInput = document.getElementById("userInput");
            const sendBtn = document.getElementById("sendBtn");

            // 챗봇 응답 사전 설정
            const botResponses = {
                "안녕": "안녕하세요! 반갑습니다. https://coding-studing.tistory.com/",
                "이름이 뭐야?": "저는 간단한 채팅봇입니다! 😊 https://coding-studing.tistory.com/",
                "어떻게 지내?": "좋아요! 당신은요? https://coding-studing.tistory.com/",
                "잘 가": "다음에 또 만나요! 👋 https://coding-studing.tistory.com/",
                "나는 Dseok이야": "오! 너는 그 유명한 IT 블로거 Dseok이군요요! 당신의 블로그 주소는 https://coding-studing.tistory.com/ 입니다!"
            };

            sendBtn.addEventListener("click", () => {
                sendMessage();
            });

            userInput.addEventListener("keypress", (event) => {
                if (event.key === "Enter") {
                    sendMessage();
                }
            });

            function sendMessage() {
                const message = userInput.value.trim();
                if (message === "") return;

                // 사용자 메시지 추가
                addMessage(message, "user-message");

                // 챗봇 응답 설정
                setTimeout(() => {
                    const response = botResponses[message] || "죄송해요, 이해하지 못했어요. 😅";
                    addMessage(response, "bot-message");
                }, 1000);

                userInput.value = "";
            }

            function addMessage(text, className) {
                const msgDiv = document.createElement("div");
                msgDiv.classList.add("message", className);
                msgDiv.textContent = text;
                chatBox.appendChild(msgDiv);
                chatBox.scrollTop = chatBox.scrollHeight;
            }
        });
    </script>
</body>
</html>
📌 코드 설명
✅ 1. HTML & CSS 구성
- chat-container: 채팅 UI 전체 컨테이너
- chat-box: 대화 내역을 표시하는 영역
- input-area: 사용자 입력을 받는 하단 영역
- user-message, bot-message: 사용자 및 챗봇 메시지 스타일링
✅ 2. JavaScript 기능
- 사용자 입력 감지: 버튼 클릭 또는 Enter 키 입력 시 sendMessage() 함수 실행
- 메시지 추가 함수 (addMessage()): 입력한 메시지를 채팅창에 추가
- 챗봇 응답 (botResponses): 사용자의 입력과 일치하는 기본 응답 제공 (미리 정의된 응답 외에는 기본 메시지 출력)
- 자동 스크롤: 새로운 메시지가 추가될 때 scrollTop을 업데이트하여 최신 메시지를 항상 보이게 함
📌 마무리 🎯
- 사용자 입력을 받아 동적으로 채팅 인터페이스 생성
- 간단한 챗봇 응답을 사전 설정하여 자동 응답 기능 구현
- CSS를 활용하여 깔끔한 UI 제공
- JavaScript 이벤트 리스너를 활용하여 실시간 인터랙션 구현

반응형
LIST
'Javascript' 카테고리의 다른 글
| [Dseok의 코딩스터디] JavaScript로 인터렉티브 타이머 효과 만들기 (0) | 2025.03.03 |
|---|---|
| [Dseok의 코딩스터디] JavaScript로 랜덤 얼굴 생성기 구현하기 (0) | 2025.03.03 |
| [Dseok의 코딩스터디] JavaScript map() 한방에 끝내기 | 개념 & 실용 예제 10가지 (0) | 2025.03.01 |
| [Dseok의 코딩스터디] JavaScript forEach() 한방에 끝내기 | 개념 & 실무 예제 10가지 | API 데이터 가져오기 (0) | 2025.03.01 |
| [Dseok의 코딩스터디] javaScript push() & pop() 한방에 끝내 | 개념 & 실용 예제 10가지 (0) | 2025.02.28 |